VPN Route Helper Tool

Happy new year!

Once again I am in the situation where I have neglected this blog; feel bad about it; decide to write something to warrant its existence 🙂 …here’s a long overdue post to hold me over for a while:

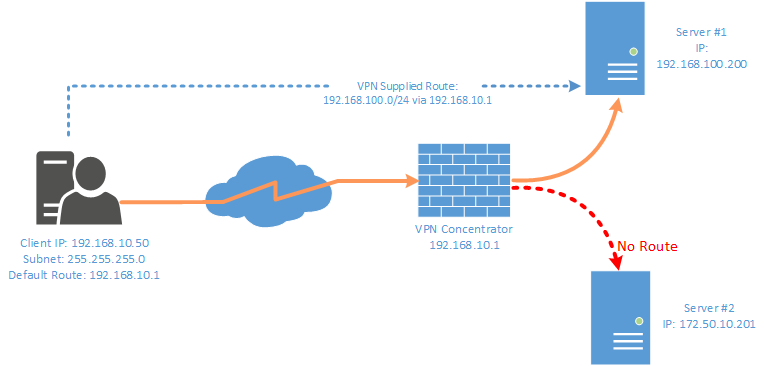
I run my own VPN that permits split-tunneling, this allows me to access infrastructure behind a VPN but not route ALL of my traffic over it (i.e. Any network that is not in my routing table will be fired off to my default gateway).

When dialing my VPN whilst away from home I would often run into an issue where certain networks I needed to access via the tunnel were unavailable without me setting static routes manually. My operating system (Windows) & the type of VPN I was using were unable to set these routes autonomously based on information provided by the concentrator. Windows does not support this out of the box for simple SSTP/L2TP/PPTP VPNconnections (I think), generally a third-party client would be required [Cisco Anyconnect or OpenVPN for example].

VPN Route ProblemTo overcome the above problem I built a simple little tool that can set routes based on a config file during dial-up of a VPN – The workflow is as follows:

  1. User dials VPN endpoint
  2. Once VPN Establishes the VPNRouteHelper tool is invoked which:
    1. Checks if there is a config file on a web-server that is accessible on the one route published
    2. If the config on the server is newer we replace the existing config with the new one
    3. We then check for the presence of active PPP dial-up adapters on the computer and grab the tunnels IP address
    4. Check if that tunnel IP address fits between a set of pre-determined ranges
    5. If the tunnel fits inside a range we loop through a list of IP ranges we wish to set routes for and then assign a default gateway based on the tunnels IP address
  3. Displays a message of the day (if enabled in config)
  4. Done

Depending if the VPN concentrator allows us  to access the networks using the newly set routes we should now be done:VPNroute Solution

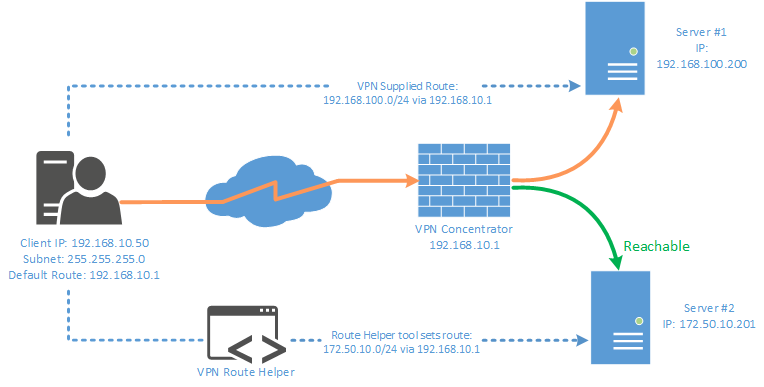
An example of the config file that is consumed by the tools is below – in this example we we will set two routes one for 172.50.10.0/24 and 10.9.0.0/22 if the user has a PPP adapter that falls inside the ranges 192.168.10.2 – 192.168.10.254 or 192.168.2.2 – 192.168.2.254

<?xml version="1.0" encoding="utf-8"?>
<!--Itterate Version number if You make any changes.-->
<VPN Version="2">
  <Routes>
    <Route netmask="172.50.10.0" subnet="255.255.255.0" description="Example Destination Subnet 1" />
    <Route netmask="10.9.0.0" subnet="255.255.252.0" description="Example Destination Subnet 2" />
  </Routes>
  <DefaultGateways>
    <DefaultGateway VPNSubnetLower="192.168.10.2" VPNSubnetUpper="192.168.10.254" DefaultGateway="192.168.10.1" SubnetDescription="RESDEV VPN 1 DialIn Range" />
    <DefaultGateway VPNSubnetLower="192.168.2.2" VPNSubnetUpper="192.168.2.254" DefaultGateway="192.168.2.1" SubnetDescription="RESDEV VPN 2 DialIn Range" />
  </DefaultGateways>
  <Messages>
    <MoTD Display="true" TitleMessage="Message From Admin" BodyMessage="This is a private VPN - You agree to all terms and conditions while using it" />
  </Messages>
</VPN>

This software does not require any external libs and is a self-contained .EXE that can be invoked automatically on connection (i.e. if you were to build a custom VPN client using the Microsoft Connection Manager Administration Kit [CMAK] like I did) or invoking it manually after you connect)

I might look at making this a bit more “enterprisey” at some stage, its not exactly a perfect solution but does the job at a pinch.

Grab the source code from my GitHub: https://github.com/coaxke/VPN-Route-Helper  

Pretty easy solution – let me know if you have any questions 🙂

-Patrick

API Rate-Shaping with F5 iRules

New theme, new blog post…

Many larger websites running software as a service platforms may opt to provide web API’s or other integration points for third-party developers to consume, thus providing an open-architecture for sharing content or data. Obviously when allowing others to reach into your application there is always the possibility that the integration point could be abused… perhaps someone writes some rubbish code and attempt to call your API 500 times a second and effectively initiates a denial of service (DoS). One method is to check something unique, such as an API key in your application and check how frequently its called, however this can become expensive especially if you need to spark up a thread for each check.

The solution – Do checking in software, but also on the edge, perhaps on an F5 load balancer using iRules…

The concept is fairly simple – We want to take both the users IP address and API Key concatenate it together and store it in a session table with a timeout. If the user/application requesting the resource attempts to call your API endpoint beyond a a pre-configured threshold (i.e. 3 times per second) they are returned a 503 HTTP status and told to come back later. Alternatively, if they don’t even pass in an API Key they get a 403 HTTP status returned. This method is fairly crude, but its effective when deployed alongside throttling done in the application. Lets see how it fits together:

As mentioned above the users IP/API Key are inserted into an iRule Table – This is a global table shared across all F5 devices in a H.A deployment and, it stores values that are indexed by keys.

Each table contains the following columns:

  • Key – This is the unique reference to the table entry and is used during table look up’s
  • Value – This is the concatenated IP/API Key
  • Timeout – The timeout type for the session entry
  • Lifetime – This is the lifetime for the session, it will expire after a certain period of time no matter how many changes or lookups are performed on it. An entry can have a lifetime and a timeout at the same time. It will expire whenever the timeout OR the lifetime expires, whichever comes first.
  • Touch Time – Indicates when the key entry was last touched – It’s used internally by the session table to keep track of when to expire entries.
  • Create Time – Indicates when the key was created.

The table would look something like this:
F5 iRule Session Table

The Rule itself:

when RULE_INIT {

	#Allow 3 Requests every 1 Second
	set static::maxRate 3
	set static::windowSecs 1

}

when HTTP_REQUEST {

	if { ([class match [string tolower [HTTP::path]] starts_with Ratelimit-URI] ) } {

		#Whitelist IP Addresses
		if { [IP::addr [IP::client_addr] equals 192.168.0.1/24] || [IP::addr [IP::client_addr] equals 10.0.0.1/22]  } {
				return
			}

			#Main logic:

		#Check if API 'APIKey' header is passed through, break if not.
		if { !( [HTTP::header exists APIKey] ) } {

			HTTP::respond 403 content "<html><h2>No API Key provided - Please provide an API Key</h2></html>"		

			#Drop the Connection afterwards
			drop
		}

		#Set VARS: - Do this after the check for an API Key...
        set limiter [crc32 [HTTP::header APIKey]]
        set clientip_limitervar [IP::client_addr]:$limiter
        set get_count [table key -count -subtable $clientip_limitervar]

			#Check if current requests breach the configured max requests per-second?
        if { $get_count < $static::maxRate } {
            incr get_count 1
             table set -subtable $clientip_limitervar $get_count $clientip_limitervar indefinite $static::windowSecs
			 } else {

					log local0. "$clientip_limitervar has exceeded the number of requests allowed"

					HTTP::respond 503 content "<html><h2>You have exceeded the maximum number of requests per minute allowed... Try again later.</h2></html>"

					#Drop the Connection afterwards
					drop
            return
        }
    }
}

The iRule DataGroup:

RateLimit URI(Click for larger Image)

So how does this iRule work? Lets step through it:

  1. When the rule i initialized two static variables are set: The “Max Rate”, how many requests are allowed within the “windowSecs” period. i.e. 3 requests per 1 second.
  2. When the HTTP request is parsed, the rule scans HTTP paths (i.e. /someservice.svc”) inside an iRule Datagroup named “Ratelimit-URI” to check if its a page that requires rate-limiting, if not breaks and returns the page content.
  3. We check if the request is coming from a white-listed IP address, if it is we return the page content without rate-limiting, otherwise the rule will continue
  4. The rule then checks if the request contains an HTTP header of “APIKey”, if not a 403 message is returned and the connection is dropped, if it is the rule continues.
  5. We then setup the variables that will be inserted into the iRule table. First we hash the APIKey as a CRC32 value to cut down on the size if its large. We then concatenate the client IP address with the resulting hash. Finally we drop it into an table
  6. A check is then performed to see if the count of requests didn’t breach the maximum number of requests set when the rule initialized, if it didn’t then when the count of requests is incremented by one and the table is updated. Otherwise if the count did breach the maximum number of requests, a 503 is returned to the user and the connection is dropped.

That’s it, simple – fairly crude, but effective as a first method of protection from someone spamming your API. Making changes to the rule is fairly simple (i.e. changing whats checked, perhaps you want to look for full URI’s instead of just the path). It may also be worth while adding a check for the size of the header before you hash to ensure no one abuses the check and forces your F5 to do a lot of expensive work, perhaps do away with the hashing all together… your call 🙂

It must be noted that the LTM platform places NO limits on the amount of memory that can be consumed by tables, because of this its recommenced that you don’t do this on larger platforms or investigate some time in setting up monitoring on your F5 device to warn you if memory is getting drastically low – “tmsh show sys mem” is your friend.

Let me know if you have any questions.

-Patrick

F5 Monitor text file contents

Another quick F5 related post:

Below is a neat little GET request that can be used in a F5 monitor to check the contents of a text file (or if it even exists) and degrade the performance of pool members if it doesnt. This could be useful for a Maintenance mode/Sorry site monitor for when a deployment is triggered.

To create the monitor:

  1. Create a new monitor from Local Traffic -> Monitors; Give it a name and a description
  2. Set Monitor type to HTTP
  3. Specify the interval times you require
  4. In the Send String Simply swap “/testfile.txt”  for your own text file name and “nlb.resdevops.com” in the example below for the target website the monitor will query for said text file.
    GET /testfile.txt HTTP/1.1\r\nHost: nlb.resdevops.com\r\nConnection:close\r\n\r\n
  5. In the  Receive String enter the contents of your text file
  6. Save it and apply the monitor to a Pool

Remember: The F5 must be able to resolve the host in the above query (you will need correct DNS/Gateway information set)

-Patrick


HTTP Get text File Monitor
 

Hosting Maintenance/Sorry site from a F5 NLB

As I’ve said in a previous post, I’m fairly new to the world of F5; That being said, I’m really enjoying the power and functionality of LTM!

One task I recently undertook was to implement a maintenance/sorry site to display when we do patch releases to our software (or if something was to go horribly wrong at a server level). The solution we opted for was to essentially use our F5 device as a web-server and host the “sorry site” from the NLB appliance. The page would show if the custom monitors we defined on a virtual server reported <1 healthy server in its respective NLB pool; if this criteria was met then an iRule would fire and show our page before relaying the request it onto the VIP.

Since I am using some LTM’s running v10.x and v11.x I’ve opted to use a method that works across both versions. This post has been written for v10.x, but rest assured, it’s a trivial task to get it working on v11; Feel free to ask if you get stuck.

So… Lets get started:

  1. First we need to generate a .class file with the content of our images (encoded in a Base64 format). This class file is called by our iRule and images are decoded when its run.
    Save the following Shell script to a location on your F5; I have called it “Base64encode.sh

    ## clear images class
    echo -n "" &gt; /var/class/images.class
    
    ## loop through real images and create base64 data for images class
    for i in $(ls /var/images); do
            echo "\"`echo \"$i\"|tr '[:upper:]' '[:lower:]'`\" := \"`base64 /var/images/$i|tr -d '\n'`\"," &gt;&gt; /var/class/images.class
    
    done
    

    SCP your image files to your F5 and place them in “/var/images”

    Fire up your favourite SSH client and Call Base64encode.sh to enumerate all images in “/var/images” and generate an image.class file (which is exported to /var/class/images.class) of key/values with the following syntax:
    “image.png” := “<Base64EncodedString”,

    (If you intend to call this class file directly from the iRule OR are referencing this from using  a data-group list in LTM v10.x you may need to execute a “B Load” or a “TMSH Load Sys Config” command from SSH so the class file is referenced).

  2. Next we need to create a Data-group list so our iRule can reference the encoded images, If we were running LTM v11.x we would be forced to download the class file and upload it from “System > File Management > Data Group File List”; however, since this is tutorial is for v10 we can simply reference our class file using a file location. From the GUI navigate to “Local Traffic > iRules > Data Group List > Create” and create the Data group as follows:
    Name: images_class
    Type: (External File)
    Path/Filename: /var/class/images.class
    File Contents: String
    Key/Value Pair Separator: :=
    Access Mode: Read Only
  3. Now we can assemble our iRule using  a template similar to the one written by thepacketmaster. The iRule below does the following:
    1. Invokes on HTTP Request
    2. Establishes What VirtualServer pool is responsible for serving up the requested website’s content
    3. Checks to see if the Active members (health) of the Pool has less than one healthy member
    4. Adds a verbose entry to F5 log with Client address and requested URL
    5. Responds with a 200 HTTP code for each image and decodes our Base64 encoded image by referencing the images_class Data Group and subsequently Images.class file we defined in the previous step
    6. Responds with the HTML of the Sorry/Maintenance Mode Page.
    when HTTP_REQUEST {
      set VSPool [LB::server pool]
      if { [active_members $VSPool] < 1 } {
        log local0. "Client [IP::client_addr] requested [HTTP::uri] no active nodes available..."
        if { [HTTP::uri] ends_with "bubbles.png" } {
          HTTP::respond 200 content [b64decode [lindex $::images_class 0]] "Content-Type" "image/png"
        } else {
          if { [HTTP::uri] ends_with "background.png" } {
            HTTP::respond 200 content [b64decode [lindex $::images_class 0]] "Content-Type" "image/png"
          } else {
            HTTP::respond 200 content "<!DOCTYPE HTML PUBLIC \"-//W3C//DTD XHTML 1.0 Transitional//EN\" \"http://www.w3.org/TR/xhtml1/DTD/xhtml1-transitional.dtd\">
    <html xml:lang=\"en\" xmlns=\"http://www.w3.org/1999/xhtml\" lang=\"en\"><head>
    
        <meta http-equiv=\"Content-Type\" content=\"text/html; charset=UTF-8\">
        <title>We'll be back!</title>
    
    <style type=\"text/css\">
    body {
        background: #f7f4f1 url(background.png) no-repeat top left;
    }
    
    #MainContent {
        background: url(bubbles.png) no-repeat top right;
        height: 500px;
        font-family: Verdana, Helvetica, Arial, sans;
        font-size: 14px;
        color: #625746;
        position: absolute;
        top: 330px;
        left: 180px;
        width: 900px;
    }
    
    #MainContent p {
        width: 450px;
    }
    
    a {
        color:#60A2B9;
    }
    a:hover {
        text-decoration: none;
    }
    </style>
    </head><body>
        <div id=\"MainContent\">
            <p><strong>Hi there! Thanks for stopping by.</strong></p>
            <p>We're making some changes on the site and expect to be back in a couple of hours.</p>
    
            <p>See you there!</p>
        </div>
    </body></html>"
          }
        }
      }
    }
    

    Replace the CSS/HTML in the above iRule with your own (same goes for the images). Remember that you MUST escape any quote marks in your HTML/JS with a “\

    Please note: I had a hard time getting the above to work with LTM v11; My HTML would show but my text would not. After a bit of head-scratching and research I re-factored the Base64 decode lines (i.e. Lines 6 & 9 above) with the following:
    HTTP::respond 200 content [b64decode [class element -value 0 images_class]] "Content-Type" "image/png"
    You may also want to look at using the iFile list functionality of LTM11 to serve up images instead of manually base encoding them (even though the above should work): https://devcentral.f5.com/tech-tips/articles/v111-ndashexternal-file-access-from-irules-via-ifiles

  4. Apply your new iRule to your respective Virtual Server and test it out. Make your Virtual Server monitors “trip” by manually shutting down pool members from the F5 to bring the overall pool into an unhealthy state

webfefail
I hope this helps anyone struggling to get something similar to this working. As always, feel free to ask questions.

Thanks,

Patrick

IIS Logging broken when traffic proxied Via F5 NLB

So you have a new F5 NLB, You have a new site hosted on IIS behind said F5…And now you have broken IIS Logging…

You may find that after deploying F5, any IIS logging will now reflect the internal IP of the F5 unit, and not the external address of the actual client. Why? When requests are passed through proxies/load balancers, the client no longer has a direct connection to the web-server itself, all traffic is proxied by the F5-Unit and the traffic looks like its coming from the last hop in the chain (F5)


X-Forwarded-For Diagram

So how do we get our logging back? Easy, it just requires two simple pre-requisites (and no downtime).


First is to insert an “X-Forwarded-For” header into each request to the web server. This header is a non-standardised header used for identifying the originating IP address of a client connecting to a web server via an HTTP proxy or load balancer.
To Insert X-Forwarded header:

  1. From your F5 Web console select Local Traffic > Select Profiles > Select Services
  2. Choose One of your custom HTTP profiles or select the default HTTP profile to edit all child profiles
  3. Scroll down the page and locate the “Insert X-Forwarded-For” property and enable it (you may need to select the custom check-box first depending on your profile type)
  4. Select update to apply changes

Next step is to install an ISAPI filter developed by F5 to amend IIS’s logging with the correct requester IP using the X-Forwarded for HTTP header Syntax {X-Forwarded-For: clientIP, Proxy1IP, Proxy2IP} (this filter is supported on both IIS6 & 7)
Download the ISAPI filter here: https://devcentral.f5.com/downloads/codeshare/F5XForwardedFor.zip


  1. Copy the F5XForwardedFor.dll file from the x86\Release or x64\Release directory (depending on your platform) into a target directory on your system.  Let’s say C:\ISAPIFilters.
  2. Ensure that the containing directory and the F5XForwardedFor.dll file have read permissions by the IIS process.  It’s easiest to just give full read access to everyone.
  3. Open the IIS Admin utility and navigate to the web server you would like to apply it to.
  4. For IIS6, Right click on your web server and select Properties.  Then select the “ISAPI Filters” tab.  From there click the “Add” button and enter “F5XForwardedFor” for the Name and the path to the file “c:\ISAPIFilters\F5XForwardedFor.dll” to the Executable field and click OK enough times to exit the property dialogs.  At this point the filter should be working for you.  You can go back into the property dialog to determine whether the filter is active or an error occurred.
  5. For II7, you’ll want to select your website and then double click on the “ISAPI Filters” icon that shows up in the Features View.  In the Actions Pane on the right select the “Add” link and enter “F5XForwardedFor” for the name and “C:\ISAPIFilters\F5XForwardedFor.dll” for the Executable.  Click OK and you are set to go.

If you’re that way inclined – there is also an IIS Module available if you think ISAPI filters are not for you (See: https://devcentral.f5.com/weblogs/Joe/archive/2009/12/23/x-forwarded-for-http-module-for-iis7-source-included.aspx)

Let me know if you have any questions 🙂

-Patrick

F5 Network Load Balancing using Route Domains

I’m pretty new to the F5 NLB scene, any network load balancing I had previously done had been through the inbuilt Windows Network Load balancing (WLB) Server role. Recently I was asked to deploy a F5 configuration to an already running production environment to handle SSL Termination, Caching and (of course) Load balancing on both web and app tiers.

The existing deployment comprised of two /22 segments (Internal and DMZ networks) with a single router as the default gateway; Everything I read online told me to use a “One armed F5 Config”. This type of config “should” let me add a single physical network to one of my segments and reach both networks using a SNAT rule to adjust the origin address on the reply; But how could this work if a router was translating requests between the two networks? I discovered after many hours, it can’t…

My answer, ensure the F5 is connected to both network segments and use Route Domains to solve my routing problems. Here’s what I did:


  1. Utilize a free port on my F5 to connect into both networks – Most people could probably just add another VLAN to their existing network, however I don’t have the ability to control the managed network
  2. Establish the 2nd untagged VLAN for the 2nd connection in Step 1
  3. Establish a new route domain from Network -> Route Domains -> Create.
      1. Enter a new description ID (I used 2 [to increment by 1 from the default Route domain used for my other External network])
      2. Give your route domain a description
      3. Enable Strict Isolation to enable cross-routing restrictions
      4. Add new VLAN as a member to Route domain
      5. Click Finished
  4. Add a new Self-IP for the 2nd network connection on your new VLAN – Add %<routedomainID> after your IP


  5. Create a new Load balanced application/Virtual server and add %<routedomainID> to your VIP Address (NOTE: you will likely need to enable SNAT auto-map to the Virtual Server profile to allow return traffic via the Routedomain)
  6. You should “hopefully” be good to go – your application is now hopefully responding correctly and your health monitor is showing a friendly green status


This solution is merely a stop-gap until we can convert it into a routed configuration (recommended setup) – where the F5 unit will be the default gateway on both networks with something like a /29 stub network between the F5 and the router.

All in all, the F5 units are pretty blimmin powerful devices – I have a good handle on the UI but have only really scratched the surface using the BigPipe/TMSH commands. I KNOW that I’ve glossed over details, please feel free to leave a comment if you have any questions (it looks like there are many stuck Engineers on the net with the same problem)

-Patrick