Cloudflare Workers – Maintenance Mode static page

About a month ago Cloudflare announced the general availability of Cloudflare Workers, a new feature to compliment the existing Cloudflare product offering which allows the execution of JavaScript at the edge of Cloudflare’s CDN prior to the request hitting your own web infrastructure.

Cloudflare Workers runs JavaScript in the Google V8 engine developed for Chrome that can handle HTTP traffic written against the Service Worker API – This means they effectively sit in the middle of the request pipe-line to intercept traffic destined to your origin, from there they are able to manipulate the request in just about any way you see fit.

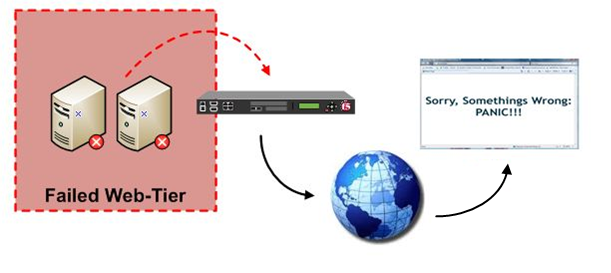
In this post I’m demonstrating how a worker could be used to respond to web-requests, and display a static maintenance-mode page whilst a website has been taken offline for deployment (whilst permitting certain to IP’s to pass through for testing purposes). Obviously, this one example but I thought it would be a neat idea to replace the F5 maintenance iRule I wrote about in a previous post.

An example execution workflow:

  1. Maintenance mode Worker code deployed to Cloudflare and appropriate routes are created
  2. Deployment pipe-line begins – PowerShell script calls Cloudflare API and enables the worker for specific routes
  3. Cloudflare intercepts all requests to my website and instead responds with the static under maintenance page for ALL URL’s
  4. Deployment pipe-line completes – PowerShell script calls Cloudflare API and disables the worker for specific routes
  5. Web requests for my website now flow down to the origin infrastructure as per normal

Easy right? Lets work through the deployment of it.

The rule logic:

The worker rule example is pretty simple! – Intercept the request, If the contents of the cf-connecting-ip header is a trusted IP address then allow them to down to the origin for testing purposes. If cf-connecting-ip is a non-trusted IP address then show the static maintenance page (note the omitted/highlighted images in the example below, see repo for full source):

addEventListener("fetch", event => {
  event.respondWith(fetchAndReplace(event.request))
})

async function fetchAndReplace(request) {

  let modifiedHeaders = new Headers()

  modifiedHeaders.set('Content-Type', 'text/html')
  modifiedHeaders.append('Pragma', 'no-cache')


  //Return maint page if you're not calling from a trusted IP
  if (request.headers.get("cf-connecting-ip") !== "123.123.123.123") 
  {
    // Return modified response.
    return new Response(maintPage, {
      headers: modifiedHeaders
    })
  }
  else //Allow users from trusted into site
  {
    //Fire all other requests directly to our WebServers
    return fetch(request)
  }
}

let maintPage = `

<!doctype html>
<title>Site Maintenance</title>
<style>
  body { 
        text-align: center; 
        padding: 150px; 
        background: url('data:image/jpeg;base64,<base64EncodedImage>'); 
        background-size: cover;
        -webkit-background-size: cover;
        -moz-background-size: cover;
        -o-background-size: cover;
      }

    .content {
        background-color: rgba(255, 255, 255, 0.75); 
        background-size: 100%;      
        color: inherit;
        padding-top: 1px;
        padding-bottom: 10px;
        padding-left: 100px;
        padding-right: 100px;
        border-radius: 15px;        
    }

  h1 { font-size: 40pt;}
  body { font: 20px Helvetica, sans-serif; color: #333; }
  article { display: block; text-align: left; width: 75%; margin: 0 auto; }
  a:hover { color: #333; text-decoration: none; }  


</style>

<article>

        <div class="background">
            <div class="content">
        <h1>We&rsquo;ll be back soon!</h1>        
            <p>We're very orry for the inconvenience but we&rsquo;re performing maintenance. Please check back soon...</p>
            <p>&mdash; <B><font color="red">{</font></B>RESDEVOPS<B><font color="red">}</font></B> Team</p>
        </div>
    </div>

</article>
`;

Deploy the Worker

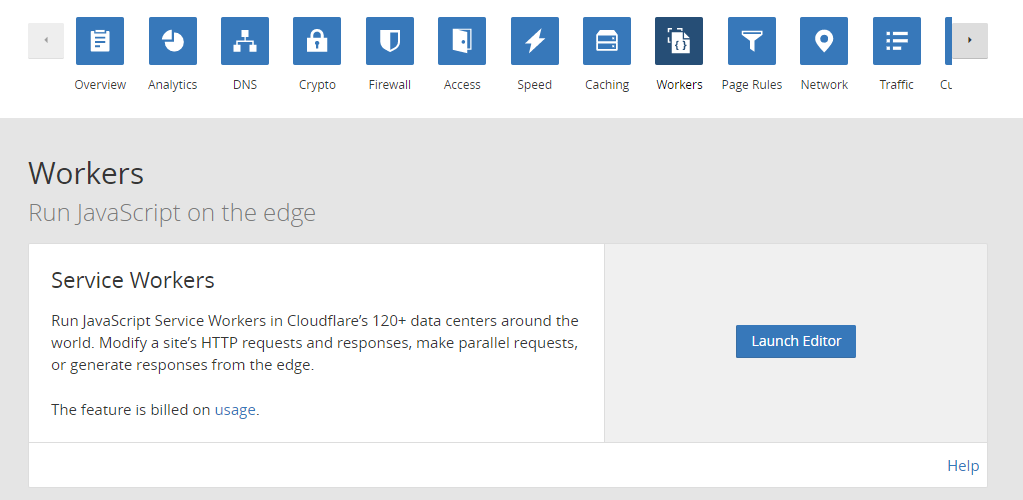
To deploy the above rule – Select Workers from the Cloudflare admin dashboard under one of your domains and launch the editor:


Add the worker script into the script body.
Select the Routes tab and individually add the routes you want to display the maintenance page on (note you can use wild-cards if required:

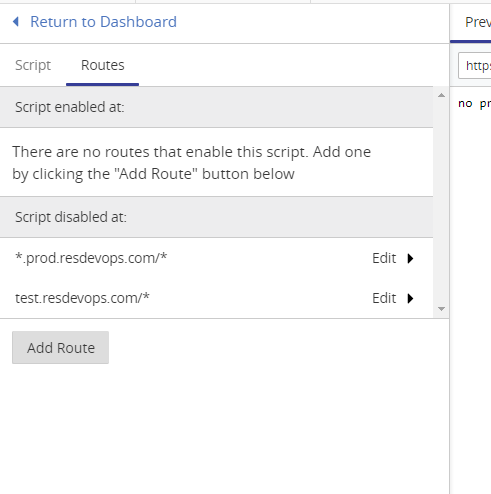
To enable your maintenance page – it’s as simple as toggling turning the route on, within minutes Cloudflare will deploy your JavaScript to their edge and invoke it for any request that matches route patterns you previously set. The maintenance page will display to everyone accessing your site externally, whilst you are still able to access due to your white-listed address:


Just like Cloudflare’s other services, Workers are able to be configured and controlled using their V4 API – We can toggle the Workers status using a simple PowerShell call. e.g:


#Generate JSON payload + convert to JSON (Setting as a PSCustomObject preserves the order or properties in payload):
		$ApiBody =  [pscustomobject]@{
			id = $workerFilterID
			pattern = "resdevops.com/*"
			enabled = $true	
		}|Convertto-Json

Invoke-RestMethod -Uri "https://api.cloudflare.com/client/v4/zones/$($zoneId)/workers/filters/$($workerFilter.Id)" 
			-Headers $headers -Body $ApiBody -Method PUT -ContentType 'application/json'

I’ve published the full source along with a script to toggle the maintenance using PowerShell and the Cloudflare API here https://github.com/coaxke/CloudflareWorkersMaintenance

Workers are pretty powerful, and there’s plenty you can do at Layer7! 🙂

Maintenance page background: pxhere.com

Building a Skype/Lync notification light

Two posts in a year, not bad 😛

Like a lot of companies that drink the Microsoft cool-aid I work for a place that uses Skype for business for text chat/voice communications… it generally works pretty well.
A few colleagues of mine have Blynclight status lights above their monitors as a visual indicator to visitors and/or other people around you that you are free/busy/uninterruptible. The concept itself looked pretty simple to build so I thought I’d give it a go… My project is called SkypeSignal (I’m not very good at names):

My solution comprises of two main parts:

  1. An Arduino nano connected to a couple of RGB LED lights
  2. A .NET application which uses the Lync client SDK to send commands to the Arduino via serial (over USB)

The Design:

The parts list for the actual build is pretty minimul:

  1. Arduino Nano
  2. A few RGB LED’s (supports a PWM driver [i.e. WS2811])
  3. a 330 Ohm resistor
  4. USB Cable
  5. Project box
  6. Wire

I went for LED’s using the WS2811 chip to drive them; this means that we only need 3 wires to run the whole thing, the below design can be modified to chain LED’s together and address them individually or alternativly run them as single LED’s by sharing the same digital input.

arduino schematic

Simple Circut

The operating workflow:

  1. Device connected to USB
  2. Relevant COM port set in SkypeSignal.exe.config and application started on PC
    1. A thread is started to run a small tray application on the windows task bar
    2. A thread is started to subscribe to Skype/Lync client events using the client SDK
  3. On client status change, a numerical command is sent down to the Arduino where it switches the light to the colour/pattern representing the presence of the user.

It would be trivial to add new features to this and I may look at adding some of these in the future:

  • Have the .NET app send a PING to com devices and using device on com port that responds with expected value
  • Flashing on missed notifications
  • Strobe + Audio Alerts on Incoming call (I’ve included a speaker in my version for future use)
  • Look at pulling the status over IP using UCWA to have a headless status device.
  • Tidying up the code – its pretty janky

Demo:

The finished project above works pretty sweet – If you want a copy of the code, check it out in my Repo here: https://github.com/coaxke/SkypeSignal

Or download a copy at https://www.resdevops.com/files/binaries/SkypeSignal.zip

Drop me a line if you have any questions.

-Patrick

Edit:
Aug 17: I’ve just added incoming call alerts to the app (requires updates for tray-app plus Arduino sketch. Enjoy

VPN Route Helper Tool

Happy new year!

Once again I am in the situation where I have neglected this blog; feel bad about it; decide to write something to warrant its existence 🙂 …here’s a long overdue post to hold me over for a while:

I run my own VPN that permits split-tunneling, this allows me to access infrastructure behind a VPN but not route ALL of my traffic over it (i.e. Any network that is not in my routing table will be fired off to my default gateway).

When dialing my VPN whilst away from home I would often run into an issue where certain networks I needed to access via the tunnel were unavailable without me setting static routes manually. My operating system (Windows) & the type of VPN I was using were unable to set these routes autonomously based on information provided by the concentrator. Windows does not support this out of the box for simple SSTP/L2TP/PPTP VPNconnections (I think), generally a third-party client would be required [Cisco Anyconnect or OpenVPN for example].

VPN Route ProblemTo overcome the above problem I built a simple little tool that can set routes based on a config file during dial-up of a VPN – The workflow is as follows:

  1. User dials VPN endpoint
  2. Once VPN Establishes the VPNRouteHelper tool is invoked which:
    1. Checks if there is a config file on a web-server that is accessible on the one route published
    2. If the config on the server is newer we replace the existing config with the new one
    3. We then check for the presence of active PPP dial-up adapters on the computer and grab the tunnels IP address
    4. Check if that tunnel IP address fits between a set of pre-determined ranges
    5. If the tunnel fits inside a range we loop through a list of IP ranges we wish to set routes for and then assign a default gateway based on the tunnels IP address
  3. Displays a message of the day (if enabled in config)
  4. Done

Depending if the VPN concentrator allows us  to access the networks using the newly set routes we should now be done:VPNroute Solution

An example of the config file that is consumed by the tools is below – in this example we we will set two routes one for 172.50.10.0/24 and 10.9.0.0/22 if the user has a PPP adapter that falls inside the ranges 192.168.10.2 – 192.168.10.254 or 192.168.2.2 – 192.168.2.254

<?xml version="1.0" encoding="utf-8"?>
<!--Itterate Version number if You make any changes.-->
<VPN Version="2">
  <Routes>
    <Route netmask="172.50.10.0" subnet="255.255.255.0" description="Example Destination Subnet 1" />
    <Route netmask="10.9.0.0" subnet="255.255.252.0" description="Example Destination Subnet 2" />
  </Routes>
  <DefaultGateways>
    <DefaultGateway VPNSubnetLower="192.168.10.2" VPNSubnetUpper="192.168.10.254" DefaultGateway="192.168.10.1" SubnetDescription="RESDEV VPN 1 DialIn Range" />
    <DefaultGateway VPNSubnetLower="192.168.2.2" VPNSubnetUpper="192.168.2.254" DefaultGateway="192.168.2.1" SubnetDescription="RESDEV VPN 2 DialIn Range" />
  </DefaultGateways>
  <Messages>
    <MoTD Display="true" TitleMessage="Message From Admin" BodyMessage="This is a private VPN - You agree to all terms and conditions while using it" />
  </Messages>
</VPN>

This software does not require any external libs and is a self-contained .EXE that can be invoked automatically on connection (i.e. if you were to build a custom VPN client using the Microsoft Connection Manager Administration Kit [CMAK] like I did) or invoking it manually after you connect)

I might look at making this a bit more “enterprisey” at some stage, its not exactly a perfect solution but does the job at a pinch.

Grab the source code from my GitHub: https://github.com/coaxke/VPN-Route-Helper  

Pretty easy solution – let me know if you have any questions 🙂

-Patrick

Active Directory Contact Sync Tool (ADCST)

I ran into a scenario recently where two companies had been sharing the same Office365 Exchange tenant for >2 years, one of the two companies was now big enough to warrant its own Exchange online instance, however the two companies still needed to be able to seamlessly contact one another [Lync(Skype For Business)/Exchange Mail/Share Calendars/etc].

We could  easily share calendar information between 365 accounts, however the problem of “finding” a user in the sister-company became an issue;  How does a user in “company A” find a user in “company B” if they don’t know them before hand? By splitting user out of the original Office 365 tenant they loose visibility to search for people in the Global Address List (GAL) to look-up job titles/user locations/phone-numbers etc (This was desired).

One option was to create contact objects in “Company A’s” active directory for users in “Company B” (and vice-versa) and have these sync to Office 365 via Directory Sync… Good-idea, however this is manual and is not a function of Office 365 “out of the box”.

…It turned out this problem wasn’t tremendously hard to solve with the improvements that Microsoft have recently made to Office 365, specifically around the ability to access and [now] query the Azure Active Directory that comes with Office 365 with the Graph API.

Introducing ADCST – A little tool written in C# to help resolve this problem by facilitating the Sync of address books between Office 365 tenants (GAL Address book syncing / federation)

How it works:

The concept is fairly trivial really – Each company delegates Read-Only access to their Azure active directory to a custom application; this is no different to allowing a Standard Application for something like Jira (from Atlassian) access to your Active Directory in Azure for authentication… The corresponding company cannot retrieve anything other than standard AD attributes nor can they attempt to authenticate as you (Allowing read-only access will generate a certificate that can be exchanged to the other company; and can be revoked at any time).

Once each company has established application access to their AzureAD Instance, the relevant details are exchanged and loaded into the ADCST tool.

ADCST Flow

Now, when the application is invoked user objects from Company A that were previously synced to Office365/AzureAD via Directory Sync are retrieved as objects by ADCST. They are then added to Company B’s on-premise Active Directory as contact objects and synced to their instance of Office365 to later appear in the GAL. If a user was to leave Company A and their account to be deleted, the corresponding contact object will be removed Company B’s GAL.

  • Objects to be synced are determined by a membership of a group (that is, users in Company A must be in a specified group otherwise they will not be synced and created)
  • Objects will only be created in a Target OU as specified in configuration.
  • Only the following attributes are synced (if they exist):
    • givenName
    • Mail
    • sn
    • displayName
    • title
    • l
    • co & c
    • st
    • streetAddress
    • department

Phew, okay… how to set it up:

How to set it up:

  1. Download a copy ADCST or go and grab the source from GITHUB 🙂
  2. Access your Azure active Directory and complete the following:
    1. Access your Office365 Portal, select AzureAD from the left hand bar of the Admin portal
      AzureAD
    2. Once tha Azure Portal loads, Click on Active Directory in the left hand nav.
    3. Click the directory tenant where you wish to register the sample application.
    4. Click the Applications tab.
    5. In the drawer, click Add.
    6. Click “Add an application my organization is developing”.
    7. Enter a friendly name for the application, for example “Contoso ADCST”, select “Web Application and/or Web API“, and click next.
    8. For the Sign-on URL, enter a value (NOTE: this is not used for the console app, so is only needed for this initial configuration): “http://localhost”
    9. For the App ID URI, enter “http://localhost”. Click the checkmark to complete the initial configuration.
    10. While still in the Azure portal, click the Configure tab of your application.
    11. Find the Client ID value and copy it aside, you will need this later when configuring your application.
    12. Under the Keys section, select either a 1-year or 2-year key – the keyValue will be displayed after you save the configuration at the end – it will be displayed, and you should save this to a secure location. NOTE: The key value is only displayed once, and you will not be able to retrieve it later.
    13. Configure Permissions – under the “Permissions to other applications” section, you will configure permissions to access the Graph (Windows Azure Active Directory). For “Windows Azure Active Directory” under the first permission column (Application Permission:1″), select “Read directory data”. Notes: this configures the App to use OAuth Client Credentials, and have Read access permissions for the application.
    14. Select the Save button at the bottom of the screen – upon successful configuration, your Key value should now be displayed – please copy and store this value in a secure location.
    15. You will need to update the ADCST.exe.config of ADCST with the updated values.
      1. AzureADTenantName = Update your tenant name for the authString value (e.g. example.onMicrosoft.com)
      2. AzureADTenantId = Update the tenantId value for the string tenantId, with your tenantId. Note: your tenantId can be discovered by opening the following metadata.xml document: https://login.windows.net/GraphDir1.onmicrosoft.com/FederationMetadata/2007-06/FederationMetadata.xml – replace “example.onMicrosoft.com”, with your tenant’s domain value (any domain that is owned by the tenant will work). The tenantId is a guid, that is part of the sts URL, returned in the first xml node’s sts url (“EntityDescriptor”): e.g. “https://sts.windows.net/”
      3. AzureADClientId = This is the ClientID noted down previously
      4. AzureADClientSecret = This is the certificate Value noted down previously
      5. AzureADUserGroup = This group contains all of the user accounts in the Remove Azure AD that you with to pull into your Active Directory on-prem as contact objects.
      6. FQDomainName = FQDN of your on-prem Active Directory Domain
      7. DestinationOUDN = The distinguished name of the Target OU that you with to create the Contact objects in
      8. ContactPrefix = This string will populate the Description field in Active Directory
      9. AllowCreationOfADObjects = Self Explanitory, Allow ADCST to create Contact objects in AD
      10. AllowDeletionOfADObjects = Self Explanitory, Allow ADCST to delete Contact objects in AD when they are no longer required
      11. VerboseLogUserCreation = Log contact creation to Debug Log
      12. VerboseLogUserDeletion = Log contact deletion to Debug log
  3. Create a Service Account to run this as and Delegate it Create/Delete rights on the OU Container on your on-prem Active Directory (see this post for some pretty good instructions – We want to be able to create/delete user accounts [even though these will be contact objects])
  4. Create a Scheduled task to call the ADCST executable on a regular basis as the Service Account that you just created.

I suggest you do some solid-testing prior to rolling this into Production (with read-only acccess you wont be able to do any damage to the Azure AD… The on-prem AD is the one you dont wanna screw-up)

The above implementation certainly wont appeal to everybody, and it could be argued that this is a specific edge-case, but it appears to do the job nicely for what was required. Let me know if you have any thoughts or suggestions.

-Patrick

The fine print: The use of this software is at your own risk – No warrantee is expressed or implied.

EDIT #1 (7/06/15): I’ve gone ahead and refactored a few things on this project. The following has changed:

  • ADCST will now Sync nominated Group’s to  Active Directory as contact Objects (I want to change this to normal Group objects with members expanded from source groups). (Synced Group [Distinguished name] destination defined using the “GroupsDestinationOUDN” App.Config Value + Source Group defined using AzureADGroupsGroup App.Config Value).
  • Users that are synced are now added to a nominated security group – This can be used to lock down groups/resources in Exchange to Internal users as well as contact objects contained in this new security group to prevent spam. (Group [distinguished named] defined using the “PermittedSendersGroupDN” App.Config Value).

Mitigate MS15-034 using F5 LTM iRules

So last Tuesday Microsoft announced MS15-034, a critical security bug in the HTTP.sys kernel driver impacting pretty much all versions of Windows; This meant anything using this driver instantly become vulnerable, including IIS 🙁

Whilst the article specified that this issue could allow an attacker to execute arbitrary code on a remote server, as of writing this no Proof of Concept exists. That said we do know how to bring a server to its knees by overflowing an Interger when sending a large Range HTTP header whilst making a request to an IIS web-server, generally resulting in a complete system lockup or blue-screen (bad!)

So for those of you who cannot patch immediately for what ever reason, but happen to have F5 LTM infrastructure, good news – you could potentially use the following to mitigate the onslaught of bots already scanning for this vulnerability / script kiddies attempting to break websites for the lulz.

To demonstrate the issue:

I wanted to see how hard it was to execute this vulnerability. I installed a fresh version of Windows Server 2012 Standard in a VM and proceed to add the IIS role.

The bug is exploitable if Output Caching  (Kernel Cache) is enabled on IIS (Which is by default).
Output caching makes web pages tremendously responsive during the round-trip to the server. When a user requests a particular page, the web server returns it to the client browser and stores a copy of that processed web page in the memory on the web server and returns it to the client in subsequent requests for that same content, which eliminates the need to reprocess that page in the future.

IIS 8 Output Caching

If we fire up WGET/Curl (prob could be done in Powershell using Invoke-Webrequest too if you wanted) and request the image that shows up on IIS8’s ‘Welcome’ page with a HTTP Range header with a large value we will recieve a blue-screen (took me 3 tries to get the result with Curl)

i.e.

wget --header="Range: bytes=18-18446744073709551615" http://192.168.1.129/iis-85.png

or

curl -v 192.168.1.129/iis-85.png -H "Range: bytes=18-18446744073709551615"


IISSploit

To mitigate the Vuln:

To Mitigate the vulnerability go ahead and add the below iRule to your F5 device and add it near the top of your list of rules on Virtual Servers that are balancing Windows Server web-servers.(This requires a HTTP profile enabled for the virtual server as we’re at layer7):

##############################################
# Patrick S - 16/04/15
# This iRule will drop the "RANGE" header if it contains a LONG range value to
# mitigate the effects of https://technet.microsoft.com/library/security/MS15-034
##############################################
when HTTP_REQUEST {

set vip [IP::local_addr]:[TCP::local_port]

if { ([HTTP::header exists "Range"]) } {
# If the range Matches REGEX log the result, return a 400 (patched) and then drop the socket.
    if { ([HTTP::header exists "Range"]) and ([HTTP::header "Range"] matches_regex {bytes\s*=.*([0-9]){10,}.*})} {
        log local0. "Potential MS15-034 Exploitation Attempt to [HTTP::host] in uri [HTTP::uri] from [IP::client_addr] on VIP $vip"
        HTTP::respond 400
        drop
        }
    }
}

Note the Regular expression in the above on Line 12. This is based off an iRule written by the community for the F5 ASM. It will prevent someone sending in range requests longer than 10 bytes in length. and can be tested by one of the best online REGEX testers on the net: (https://regex101.com)

regex match

The above REGEX also supports other (less-known) supported scenarios mentioned here:

  1. Range requests with white-space (i.e. Range: bytes = 2 – 18446744073709551615)
  2. Range requests with leading-zeros (i.e. Range: bytes=2-018446744073709551615)
  3. Range requests that contain Multiple range requests (i.e. Range: bytes=2-3,4-18446744073709551615)

Good luck, let me know if you have any questions… and…

Patch now!!!

The above should only be a stop-gap, patch this problem as soon as possible, or you’re gonna have a bad day!

Download Patcheshttps://technet.microsoft.com/en-us/library/security/ms15-034.aspx
Further Reading on KB3042553: https://support.microsoft.com/en-us/kb/3042553
Potential Work-around (if you dont care about performance): https://technet.microsoft.com/en-us/library/security/ms15-034.aspx#ID0EHIAC

-Patrick

API Rate-Shaping with F5 iRules

New theme, new blog post…

Many larger websites running software as a service platforms may opt to provide web API’s or other integration points for third-party developers to consume, thus providing an open-architecture for sharing content or data. Obviously when allowing others to reach into your application there is always the possibility that the integration point could be abused… perhaps someone writes some rubbish code and attempt to call your API 500 times a second and effectively initiates a denial of service (DoS). One method is to check something unique, such as an API key in your application and check how frequently its called, however this can become expensive especially if you need to spark up a thread for each check.

The solution – Do checking in software, but also on the edge, perhaps on an F5 load balancer using iRules…

The concept is fairly simple – We want to take both the users IP address and API Key concatenate it together and store it in a session table with a timeout. If the user/application requesting the resource attempts to call your API endpoint beyond a a pre-configured threshold (i.e. 3 times per second) they are returned a 503 HTTP status and told to come back later. Alternatively, if they don’t even pass in an API Key they get a 403 HTTP status returned. This method is fairly crude, but its effective when deployed alongside throttling done in the application. Lets see how it fits together:

As mentioned above the users IP/API Key are inserted into an iRule Table – This is a global table shared across all F5 devices in a H.A deployment and, it stores values that are indexed by keys.

Each table contains the following columns:

  • Key – This is the unique reference to the table entry and is used during table look up’s
  • Value – This is the concatenated IP/API Key
  • Timeout – The timeout type for the session entry
  • Lifetime – This is the lifetime for the session, it will expire after a certain period of time no matter how many changes or lookups are performed on it. An entry can have a lifetime and a timeout at the same time. It will expire whenever the timeout OR the lifetime expires, whichever comes first.
  • Touch Time – Indicates when the key entry was last touched – It’s used internally by the session table to keep track of when to expire entries.
  • Create Time – Indicates when the key was created.

The table would look something like this:
F5 iRule Session Table

The Rule itself:

when RULE_INIT {

	#Allow 3 Requests every 1 Second
	set static::maxRate 3
	set static::windowSecs 1

}

when HTTP_REQUEST {

	if { ([class match [string tolower [HTTP::path]] starts_with Ratelimit-URI] ) } {

		#Whitelist IP Addresses
		if { [IP::addr [IP::client_addr] equals 192.168.0.1/24] || [IP::addr [IP::client_addr] equals 10.0.0.1/22]  } {
				return
			}

			#Main logic:

		#Check if API 'APIKey' header is passed through, break if not.
		if { !( [HTTP::header exists APIKey] ) } {

			HTTP::respond 403 content "<html><h2>No API Key provided - Please provide an API Key</h2></html>"		

			#Drop the Connection afterwards
			drop
		}

		#Set VARS: - Do this after the check for an API Key...
        set limiter [crc32 [HTTP::header APIKey]]
        set clientip_limitervar [IP::client_addr]:$limiter
        set get_count [table key -count -subtable $clientip_limitervar]

			#Check if current requests breach the configured max requests per-second?
        if { $get_count < $static::maxRate } {
            incr get_count 1
             table set -subtable $clientip_limitervar $get_count $clientip_limitervar indefinite $static::windowSecs
			 } else {

					log local0. "$clientip_limitervar has exceeded the number of requests allowed"

					HTTP::respond 503 content "<html><h2>You have exceeded the maximum number of requests per minute allowed... Try again later.</h2></html>"

					#Drop the Connection afterwards
					drop
            return
        }
    }
}

The iRule DataGroup:

RateLimit URI(Click for larger Image)

So how does this iRule work? Lets step through it:

  1. When the rule i initialized two static variables are set: The “Max Rate”, how many requests are allowed within the “windowSecs” period. i.e. 3 requests per 1 second.
  2. When the HTTP request is parsed, the rule scans HTTP paths (i.e. /someservice.svc”) inside an iRule Datagroup named “Ratelimit-URI” to check if its a page that requires rate-limiting, if not breaks and returns the page content.
  3. We check if the request is coming from a white-listed IP address, if it is we return the page content without rate-limiting, otherwise the rule will continue
  4. The rule then checks if the request contains an HTTP header of “APIKey”, if not a 403 message is returned and the connection is dropped, if it is the rule continues.
  5. We then setup the variables that will be inserted into the iRule table. First we hash the APIKey as a CRC32 value to cut down on the size if its large. We then concatenate the client IP address with the resulting hash. Finally we drop it into an table
  6. A check is then performed to see if the count of requests didn’t breach the maximum number of requests set when the rule initialized, if it didn’t then when the count of requests is incremented by one and the table is updated. Otherwise if the count did breach the maximum number of requests, a 503 is returned to the user and the connection is dropped.

That’s it, simple – fairly crude, but effective as a first method of protection from someone spamming your API. Making changes to the rule is fairly simple (i.e. changing whats checked, perhaps you want to look for full URI’s instead of just the path). It may also be worth while adding a check for the size of the header before you hash to ensure no one abuses the check and forces your F5 to do a lot of expensive work, perhaps do away with the hashing all together… your call 🙂

It must be noted that the LTM platform places NO limits on the amount of memory that can be consumed by tables, because of this its recommenced that you don’t do this on larger platforms or investigate some time in setting up monitoring on your F5 device to warn you if memory is getting drastically low – “tmsh show sys mem” is your friend.

Let me know if you have any questions.

-Patrick

Windows Server App-Fabric “failed to connect to hosts in cluster”

I’ve just completed the process of building a new AppFabric Cluster on version 1.1 with a SQL backend over an existing XML Based 1.0 cluster… The new version appeared to fix a lot of issues that existed in V1.0, plus by installing a Cumulative Update  you are able to use Windows Server 2012 standard to host a Highly Available cache cluster (now that it includes cluster functionality that only previously existed in Server Enterprise in 2008/R2)

Fortunately my old automated deployment scripts did not need that much tweaking aside from the obvious changes required to use a SQL server to store the configuration + changing my secondary cache count for scaling.

After the script established the Cache Cluster and added the host I ran into an issue when attempting to start the cluster to add the individual caches and assign permissions, I got the following error: “Use-CacheCluster : ErrorCode<ERRCAdmin040>:SubStatus<ES0001>:Failed to connect to hosts in the cluster


cache-error
 

There appeared to be no real help on MSDN  to help me solve my problem… A bit of research yielded the following fixes:

  1. Ensure that the AppFabric Cache Host can resolve itself (and other Cache Lead-Hosts) via DNS, Hosts Files etc.
  2. Ensure that the Remote Registry Service has been started and the rule “Remote Service Management (NP-In)” on the Windows Firewall rule is allowed.
  3. Ensure that Firewall rules exist to allow App-Fabric communication (e.g. Port 22233 for cache port, 22234 for Cluster port etc).

My script opened firewall ports but didn’t start the remote registry service… After starting this service and reconfiguring my cache once more everything came online – I was able to add all all of my cache nodes to my brand new cluster.

Extend AD Schema to allow greater Office 365 Management

If you run Office 365 and use Directory sync to push Active Directory objects to Microsoft Online then you’ll likely know that if you want to make a change to a mailbox, contact or distribution group, then it needs to be done on that object within AD.
This is great, and Directory Sync is a brilliant idea but it seems to have a slight pitfall; It assumes that you’ve previously had Exchange deployed… Dirsync wants to sync Exchange AD Attributes

As an Example; You may have run into an instance where you’ve wanted apply settings such as delivery options or mail tips to a distribution group; Searching through Active directory yields no results for the correct attribute so the the setting has to be changed online/via powershell? Wrong:

 Error: The action ‘Set-DistributionGroup’, ‘RequireSenderAuthenticationEnabled’, can’t be performed on the object ‘RESDEVManagers’ because the object is being synchronized from your on-premises organization. This action should be performed on the object in your on-premises organization.

Now, in order to set this attribute manually I could set the MsExchRequireAuthToSendTo to ‘true’ from the attribute editor in Active Directory Users and Computers (or ADSI)… But I don’t have Exchange, I never had exchange and therefore I don’t have that attribute in my AD schema.

This Microsoft KB article (http://support.microsoft.com/kb/2256198) explains what AD attributes are referenced and written to/from AD and a quick look in the FIM Metaverse designer confirms this:


Fim Attributes
 So, We need to add these Exchange attributes to our Schema – To do so, we have a couple of options

  • You could manually create the attributes from ADSI edit and set them to the correct Type as per FIM’s Metaverse designer – Messy and could cause issues
  • Run the Exchange 2010 Installation and extend your AD schema to include all MsExch* attributes so you can set them from ADUC/Powershell/Some other management tool

We’ll opt for the 2nd option (its easier and automated) – Let’s get started:

  1. Download the Exchange 2010 Trial media from here. Run the executable and extract the files to a temp location.
  2. Ensure your account is a member of Enterprise Admins and Schema Admins in Active directory. Change Directory to your extracted Installation media  and run the following: Setup /PrepareSchema 
    prepare Schema

    Wait for the tool to complete.
  3. Open up Active Directory Users and Computers and enable View > Advanced features (If you haven’t already). 
    Active Directory Users and computers
  4. Locate an object from the AD tree and click the Attribute Editor Tab and Scroll down to MSExch- ; Your AD Schema has been extended successfully and you now have a bit more control over objects in Office 365. 
    RESDEV Managers

Hopefully everything’s there and the process went smoothly

You can go ahead and edit MsExchServerHintTranslations for Mailtips and MSExchRequireAuthtoSendTo for Distribution group send as permissions (as two examples)

-Patrick

F5 Monitor text file contents

Another quick F5 related post:

Below is a neat little GET request that can be used in a F5 monitor to check the contents of a text file (or if it even exists) and degrade the performance of pool members if it doesnt. This could be useful for a Maintenance mode/Sorry site monitor for when a deployment is triggered.

To create the monitor:

  1. Create a new monitor from Local Traffic -> Monitors; Give it a name and a description
  2. Set Monitor type to HTTP
  3. Specify the interval times you require
  4. In the Send String Simply swap “/testfile.txt”  for your own text file name and “nlb.resdevops.com” in the example below for the target website the monitor will query for said text file.
    GET /testfile.txt HTTP/1.1\r\nHost: nlb.resdevops.com\r\nConnection:close\r\n\r\n
  5. In the  Receive String enter the contents of your text file
  6. Save it and apply the monitor to a Pool

Remember: The F5 must be able to resolve the host in the above query (you will need correct DNS/Gateway information set)

-Patrick


HTTP Get text File Monitor
 

Hosting Maintenance/Sorry site from a F5 NLB

As I’ve said in a previous post, I’m fairly new to the world of F5; That being said, I’m really enjoying the power and functionality of LTM!

One task I recently undertook was to implement a maintenance/sorry site to display when we do patch releases to our software (or if something was to go horribly wrong at a server level). The solution we opted for was to essentially use our F5 device as a web-server and host the “sorry site” from the NLB appliance. The page would show if the custom monitors we defined on a virtual server reported <1 healthy server in its respective NLB pool; if this criteria was met then an iRule would fire and show our page before relaying the request it onto the VIP.

Since I am using some LTM’s running v10.x and v11.x I’ve opted to use a method that works across both versions. This post has been written for v10.x, but rest assured, it’s a trivial task to get it working on v11; Feel free to ask if you get stuck.

So… Lets get started:

  1. First we need to generate a .class file with the content of our images (encoded in a Base64 format). This class file is called by our iRule and images are decoded when its run.
    Save the following Shell script to a location on your F5; I have called it “Base64encode.sh

    ## clear images class
    echo -n "" &gt; /var/class/images.class
    
    ## loop through real images and create base64 data for images class
    for i in $(ls /var/images); do
            echo "\"`echo \"$i\"|tr '[:upper:]' '[:lower:]'`\" := \"`base64 /var/images/$i|tr -d '\n'`\"," &gt;&gt; /var/class/images.class
    
    done
    

    SCP your image files to your F5 and place them in “/var/images”

    Fire up your favourite SSH client and Call Base64encode.sh to enumerate all images in “/var/images” and generate an image.class file (which is exported to /var/class/images.class) of key/values with the following syntax:
    “image.png” := “<Base64EncodedString”,

    (If you intend to call this class file directly from the iRule OR are referencing this from using  a data-group list in LTM v10.x you may need to execute a “B Load” or a “TMSH Load Sys Config” command from SSH so the class file is referenced).

  2. Next we need to create a Data-group list so our iRule can reference the encoded images, If we were running LTM v11.x we would be forced to download the class file and upload it from “System > File Management > Data Group File List”; however, since this is tutorial is for v10 we can simply reference our class file using a file location. From the GUI navigate to “Local Traffic > iRules > Data Group List > Create” and create the Data group as follows:
    Name: images_class
    Type: (External File)
    Path/Filename: /var/class/images.class
    File Contents: String
    Key/Value Pair Separator: :=
    Access Mode: Read Only
  3. Now we can assemble our iRule using  a template similar to the one written by thepacketmaster. The iRule below does the following:
    1. Invokes on HTTP Request
    2. Establishes What VirtualServer pool is responsible for serving up the requested website’s content
    3. Checks to see if the Active members (health) of the Pool has less than one healthy member
    4. Adds a verbose entry to F5 log with Client address and requested URL
    5. Responds with a 200 HTTP code for each image and decodes our Base64 encoded image by referencing the images_class Data Group and subsequently Images.class file we defined in the previous step
    6. Responds with the HTML of the Sorry/Maintenance Mode Page.
    when HTTP_REQUEST {
      set VSPool [LB::server pool]
      if { [active_members $VSPool] < 1 } {
        log local0. "Client [IP::client_addr] requested [HTTP::uri] no active nodes available..."
        if { [HTTP::uri] ends_with "bubbles.png" } {
          HTTP::respond 200 content [b64decode [lindex $::images_class 0]] "Content-Type" "image/png"
        } else {
          if { [HTTP::uri] ends_with "background.png" } {
            HTTP::respond 200 content [b64decode [lindex $::images_class 0]] "Content-Type" "image/png"
          } else {
            HTTP::respond 200 content "<!DOCTYPE HTML PUBLIC \"-//W3C//DTD XHTML 1.0 Transitional//EN\" \"http://www.w3.org/TR/xhtml1/DTD/xhtml1-transitional.dtd\">
    <html xml:lang=\"en\" xmlns=\"http://www.w3.org/1999/xhtml\" lang=\"en\"><head>
    
        <meta http-equiv=\"Content-Type\" content=\"text/html; charset=UTF-8\">
        <title>We'll be back!</title>
    
    <style type=\"text/css\">
    body {
        background: #f7f4f1 url(background.png) no-repeat top left;
    }
    
    #MainContent {
        background: url(bubbles.png) no-repeat top right;
        height: 500px;
        font-family: Verdana, Helvetica, Arial, sans;
        font-size: 14px;
        color: #625746;
        position: absolute;
        top: 330px;
        left: 180px;
        width: 900px;
    }
    
    #MainContent p {
        width: 450px;
    }
    
    a {
        color:#60A2B9;
    }
    a:hover {
        text-decoration: none;
    }
    </style>
    </head><body>
        <div id=\"MainContent\">
            <p><strong>Hi there! Thanks for stopping by.</strong></p>
            <p>We're making some changes on the site and expect to be back in a couple of hours.</p>
    
            <p>See you there!</p>
        </div>
    </body></html>"
          }
        }
      }
    }
    

    Replace the CSS/HTML in the above iRule with your own (same goes for the images). Remember that you MUST escape any quote marks in your HTML/JS with a “\

    Please note: I had a hard time getting the above to work with LTM v11; My HTML would show but my text would not. After a bit of head-scratching and research I re-factored the Base64 decode lines (i.e. Lines 6 & 9 above) with the following:
    HTTP::respond 200 content [b64decode [class element -value 0 images_class]] "Content-Type" "image/png"
    You may also want to look at using the iFile list functionality of LTM11 to serve up images instead of manually base encoding them (even though the above should work): https://devcentral.f5.com/tech-tips/articles/v111-ndashexternal-file-access-from-irules-via-ifiles

  4. Apply your new iRule to your respective Virtual Server and test it out. Make your Virtual Server monitors “trip” by manually shutting down pool members from the F5 to bring the overall pool into an unhealthy state

webfefail
I hope this helps anyone struggling to get something similar to this working. As always, feel free to ask questions.

Thanks,

Patrick

Lync 2013 executable name change can break QoS

A quick note to those with Group Policy-based QoS for Lync/OCS that I thought worthy of a blog post:

The Lync 2013 client executable file name has changed from communicator.exe in OCS and Lync 2010 to Lync.exe.

So, why does this matter – If you are applying QoS DSCP markings on Lync traffic for specific port ranges for communicator.exe (using Policy-Based QoS), you’ll likely find no markings applied to Lync 2013 client traffic. As a result, there is a possibility that call quality can be reduced or other Lync functionality slow due to a lack of traffic prioritisation.

If you’re currently running a hybrid of both clients it would be worthwhile updating these GPO’s to add in the new executable name… or replacing it if you have finished upgrading 🙂 .

-Patrick

Lync GPO's

SCOM Win-RM Powershell – Hitting WSMan Memory Limits

scomposhWinRM can be a very useful tool (even if it is somewhat of a challenge to set-up [esp if you want to use CredSSP]. I am however finding it more and more useful to execute cmdlets for Powershell modules you cant easily install; An example is the Operations Manager 2012 cmdlets that are only installed with the Console.

For a maintance mode script we recently used (similar to this one) I found myself tripping over one of the following errors when attempting to remotely connect to my SCOM server and put a group into maintenance mode:


Processing data from remote server failed with the following error message: TheWSMan Providor host did not return a proper response. A Providor in the host process may have behaved improperly. For more information, see the about help _Remoting_troubleshooting help topic.

Or

Processing data for a remote command failed with the following error message: Deserialized objects exceed the memory quota. For more information, see
the about_Remote_Troubleshooting Help topic


These messages are nice and generic with no real hint to the cause. So why does it happen?

When attempting to run up the OperationsManager Module (and subsequantly connect to the SCOM SDK) to run cmdlets we will exhaust the 150MB defualt WSMan memory allocation. In order to continue we will need to exend the “MaxMemoryPerShellMb” allocation Run the following to view/alter these values:

#View Existing WSMan MaxMemory Value
Get-Item WSMan:\localhost\Shell\MaxMemoryPerShellMB

#Set new WSMan MaxMemory Value to 1 Gb
Set-Item WSMan:\localhost\Shell\MaxMemoryPerShellMB 1024 -Force

Easy 🙂

-Patrick


Office 365 Search and Delete mail using Powershell

A neat feature of Exchange is the ability to run up a search across mailboxes within an organization from Powershell using the Search-Mailbox cmdlet and delete inappropriate or harmful messages using the -DeleteContent parameter. Fortunately these features exist in Office 365 if you are an Exchange Online Administrator

While administrators can use the Multi-Mailbox search feature in the Exchange control panel UI to locate mail, you  may discover you are unable to remove messages directly without some PowerShell magic.

The below script requires you add your admin account to the “Discovery Management” role from Roles & Auditing on the Exchange Control Panel (ECP).

#Every mailbox within the Organisation

#ARGS
[string]$decision = "n"

Write-Host "This script requires the `"Discovery Management`" Exchange Role-Group PLUS `"Mailbox Import Export`" Role assigned to your Exchange onlineAdmin Account `nPlease add it before proceeding:"
Write-Host "`n`nEnter Administration Credentials"

$LiveCred = Get-Credential

#Pass Creds to Outlook.com and generate PS Session
$Session = New-PSSession -ConfigurationName Microsoft.Exchange -ConnectionUri https://ps.outlook.com/powershell/ -Credential $LiveCred -Authentication Basic -AllowRedirection
#Import PS Session/Grab MSOL Cmdlets
Import-PSSession $Session

$Subject = Read-Host "Please Enter a Message Subject to be deleted from ALL mailboxes:"

$decision = Read-Host "Are you sure youi want to delete messages with the subject " $Subject " (Y/N)?"

if ($decision -eq "y")
	{
	Write-Host "Deleting" $Subject
	Get-Mailbox -ResultSize unlimited | Search-Mailbox -SearchQuery "subject:$Subject" -DeleteContent -Confirm
	}
else
	{
	Write-Host "Nothing deleted"
	}
Remove-PSSession

Write-Host "Connection to MSOL closed"

Warning: Use the above script with caution; When using the DeleteContent parameter, messages are permanently deleted from the user’s mailbox and cannot be recovered. (It could also take some time to run over a big Office365 Tenant)

See related Office 365 help article here:  here: http://help.outlook.com/en-ca/140/gg315525.aspx

-Patrick

IIS Logging broken when traffic proxied Via F5 NLB

So you have a new F5 NLB, You have a new site hosted on IIS behind said F5…And now you have broken IIS Logging…

You may find that after deploying F5, any IIS logging will now reflect the internal IP of the F5 unit, and not the external address of the actual client. Why? When requests are passed through proxies/load balancers, the client no longer has a direct connection to the web-server itself, all traffic is proxied by the F5-Unit and the traffic looks like its coming from the last hop in the chain (F5)


X-Forwarded-For Diagram

So how do we get our logging back? Easy, it just requires two simple pre-requisites (and no downtime).


First is to insert an “X-Forwarded-For” header into each request to the web server. This header is a non-standardised header used for identifying the originating IP address of a client connecting to a web server via an HTTP proxy or load balancer.
To Insert X-Forwarded header:

  1. From your F5 Web console select Local Traffic > Select Profiles > Select Services
  2. Choose One of your custom HTTP profiles or select the default HTTP profile to edit all child profiles
  3. Scroll down the page and locate the “Insert X-Forwarded-For” property and enable it (you may need to select the custom check-box first depending on your profile type)
  4. Select update to apply changes

Next step is to install an ISAPI filter developed by F5 to amend IIS’s logging with the correct requester IP using the X-Forwarded for HTTP header Syntax {X-Forwarded-For: clientIP, Proxy1IP, Proxy2IP} (this filter is supported on both IIS6 & 7)
Download the ISAPI filter here: https://devcentral.f5.com/downloads/codeshare/F5XForwardedFor.zip


  1. Copy the F5XForwardedFor.dll file from the x86\Release or x64\Release directory (depending on your platform) into a target directory on your system.  Let’s say C:\ISAPIFilters.
  2. Ensure that the containing directory and the F5XForwardedFor.dll file have read permissions by the IIS process.  It’s easiest to just give full read access to everyone.
  3. Open the IIS Admin utility and navigate to the web server you would like to apply it to.
  4. For IIS6, Right click on your web server and select Properties.  Then select the “ISAPI Filters” tab.  From there click the “Add” button and enter “F5XForwardedFor” for the Name and the path to the file “c:\ISAPIFilters\F5XForwardedFor.dll” to the Executable field and click OK enough times to exit the property dialogs.  At this point the filter should be working for you.  You can go back into the property dialog to determine whether the filter is active or an error occurred.
  5. For II7, you’ll want to select your website and then double click on the “ISAPI Filters” icon that shows up in the Features View.  In the Actions Pane on the right select the “Add” link and enter “F5XForwardedFor” for the name and “C:\ISAPIFilters\F5XForwardedFor.dll” for the Executable.  Click OK and you are set to go.

If you’re that way inclined – there is also an IIS Module available if you think ISAPI filters are not for you (See: https://devcentral.f5.com/weblogs/Joe/archive/2009/12/23/x-forwarded-for-http-module-for-iis7-source-included.aspx)

Let me know if you have any questions 🙂

-Patrick

Unable to Open Lync CSCP from Lync Server

When deploying a Lync Server the other day I spent a good 15 mins (stupid me) trying to figure out why I couldn’t open the Lync CSCP control panel from the Lync Server – I kept getting:

HTTP Error 401.1 – Unauthorized

You do not have permission to view this directory or page using the credentials that you supplied.

I had defined an Admin URL when establishing my topology (and published it), plus I had set the appropriate DNS records within my domain to make the CSCP site resolve – still no Dice. I finally ended up trying from another server which had Silverlight installed… It worked!?!

So what was the cause?
Back in Win Server 2003 Sp1 (and subsequent versions of Windows) Microsoft introduced a loop-back security check. This feature prevents access to a web application using a fully qualified domain name (FQDN) if the attempt to access it takes place from a machine that hosts that application. The end result is a 401. 1 Access denied from the web server and a logon failure event in the Windows event log.

A work around for the issue if you really want to access the Lync CSCP from the Lync server itself (using anything other than https://localhost/cscp):

  1. Logon on to the Lync server with an account that is member of the local admins group
  2. Start “regedit”
  3. Navigate and expand the following reg key “HKEY_LOCAL_MACHINE\SYSTEM\CurrentControlSet\Services\LanmanServer\Parameters”
  4. Right-click Parameters, click New, and then click DWORD (32-bit) Value.
  5. In the Value name box, type DisableStrictNameChecking, and then press ENTER.
  6. Now navigate to “HKEY_LOCAL_MACHINE\SYSTEM\CurrentControlSet\Control\Lsa\MSV1_0”
  7. Right-click MSV1_0, point to New, and then click Multi-String Value.
  8. Type BackConnectionHostNames, and then press ENTER
  9. Right-click BackConnectionHostNames, and then click Modify.
  10. In the Value data box, type the host name (or the host names) for the sites that are on the local computer, and then click OK.
  11. Quit Registry Editor, and then restart your server

You should be good to go 🙂

For more reading + another possible (and less-secure) work around for a lab environment see KB896861

-Patrick