I ran into a scenario recently where two companies had been sharing the same Office365 Exchange tenant for >2 years, one of the two companies was now big enough to warrant its own Exchange online instance, however the two companies still needed to be able to seamlessly contact one another [Lync(Skype For Business)/Exchange Mail/Share Calendars/etc].
We could easily share calendar information between 365 accounts, however the problem of “finding” a user in the sister-company became an issue; How does a user in “company A” find a user in “company B” if they don’t know them before hand? By splitting user out of the original Office 365 tenant they loose visibility to search for people in the Global Address List (GAL) to look-up job titles/user locations/phone-numbers etc (This was desired).
One option was to create contact objects in “Company A’s” active directory for users in “Company B” (and vice-versa) and have these sync to Office 365 via Directory Sync… Good-idea, however this is manual and is not a function of Office 365 “out of the box”.
…It turned out this problem wasn’t tremendously hard to solve with the improvements that Microsoft have recently made to Office 365, specifically around the ability to access and [now] query the Azure Active Directory that comes with Office 365 with the Graph API.
Introducing ADCST – A little tool written in C# to help resolve this problem by facilitating the Sync of address books between Office 365 tenants (GAL Address book syncing / federation)
How it works:
The concept is fairly trivial really – Each company delegates Read-Only access to their Azure active directory to a custom application; this is no different to allowing a Standard Application for something like Jira (from Atlassian) access to your Active Directory in Azure for authentication… The corresponding company cannot retrieve anything other than standard AD attributes nor can they attempt to authenticate as you (Allowing read-only access will generate a certificate that can be exchanged to the other company; and can be revoked at any time).
Once each company has established application access to their AzureAD Instance, the relevant details are exchanged and loaded into the ADCST tool.
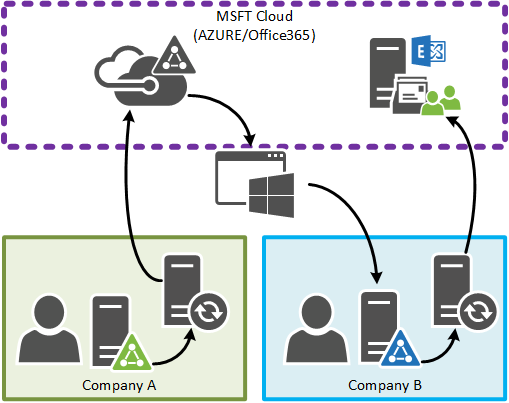
Now, when the application is invoked user objects from Company A that were previously synced to Office365/AzureAD via Directory Sync are retrieved as objects by ADCST. They are then added to Company B’s on-premise Active Directory as contact objects and synced to their instance of Office365 to later appear in the GAL. If a user was to leave Company A and their account to be deleted, the corresponding contact object will be removed Company B’s GAL.
- Objects to be synced are determined by a membership of a group (that is, users in Company A must be in a specified group otherwise they will not be synced and created)
- Objects will only be created in a Target OU as specified in configuration.
- Only the following attributes are synced (if they exist):
- givenName
- sn
- displayName
- title
- l
- co & c
- st
- streetAddress
- department
Phew, okay… how to set it up:
How to set it up:
- Download a copy ADCST or go and grab the source from GITHUB 🙂
- Access your Azure active Directory and complete the following:
- Access your Office365 Portal, select AzureAD from the left hand bar of the Admin portal
- Once tha Azure Portal loads, Click on Active Directory in the left hand nav.
- Click the directory tenant where you wish to register the sample application.
- Click the Applications tab.
- In the drawer, click Add.
- Click “Add an application my organization is developing”.
- Enter a friendly name for the application, for example “Contoso ADCST”, select “Web Application and/or Web API“, and click next.
- For the Sign-on URL, enter a value (NOTE: this is not used for the console app, so is only needed for this initial configuration): “http://localhost”
- For the App ID URI, enter “http://localhost”. Click the checkmark to complete the initial configuration.
- While still in the Azure portal, click the Configure tab of your application.
- Find the Client ID value and copy it aside, you will need this later when configuring your application.
- Under the Keys section, select either a 1-year or 2-year key – the keyValue will be displayed after you save the configuration at the end – it will be displayed, and you should save this to a secure location. NOTE: The key value is only displayed once, and you will not be able to retrieve it later.
- Configure Permissions – under the “Permissions to other applications” section, you will configure permissions to access the Graph (Windows Azure Active Directory). For “Windows Azure Active Directory” under the first permission column (Application Permission:1″), select “Read directory data”. Notes: this configures the App to use OAuth Client Credentials, and have Read access permissions for the application.
- Select the Save button at the bottom of the screen – upon successful configuration, your Key value should now be displayed – please copy and store this value in a secure location.
- You will need to update the ADCST.exe.config of ADCST with the updated values.
- AzureADTenantName = Update your tenant name for the authString value (e.g. example.onMicrosoft.com)
- AzureADTenantId = Update the tenantId value for the string tenantId, with your tenantId. Note: your tenantId can be discovered by opening the following metadata.xml document: https://login.windows.net/GraphDir1.onmicrosoft.com/FederationMetadata/2007-06/FederationMetadata.xml – replace “example.onMicrosoft.com”, with your tenant’s domain value (any domain that is owned by the tenant will work). The tenantId is a guid, that is part of the sts URL, returned in the first xml node’s sts url (“EntityDescriptor”): e.g. “https://sts.windows.net/”
- AzureADClientId = This is the ClientID noted down previously
- AzureADClientSecret = This is the certificate Value noted down previously
- AzureADUserGroup = This group contains all of the user accounts in the Remove Azure AD that you with to pull into your Active Directory on-prem as contact objects.
- FQDomainName = FQDN of your on-prem Active Directory Domain
- DestinationOUDN = The distinguished name of the Target OU that you with to create the Contact objects in
- ContactPrefix = This string will populate the Description field in Active Directory
- AllowCreationOfADObjects = Self Explanitory, Allow ADCST to create Contact objects in AD
- AllowDeletionOfADObjects = Self Explanitory, Allow ADCST to delete Contact objects in AD when they are no longer required
- VerboseLogUserCreation = Log contact creation to Debug Log
- VerboseLogUserDeletion = Log contact deletion to Debug log
- Access your Office365 Portal, select AzureAD from the left hand bar of the Admin portal
- Create a Service Account to run this as and Delegate it Create/Delete rights on the OU Container on your on-prem Active Directory (see this post for some pretty good instructions – We want to be able to create/delete user accounts [even though these will be contact objects])
- Create a Scheduled task to call the ADCST executable on a regular basis as the Service Account that you just created.
I suggest you do some solid-testing prior to rolling this into Production (with read-only acccess you wont be able to do any damage to the Azure AD… The on-prem AD is the one you dont wanna screw-up)
The above implementation certainly wont appeal to everybody, and it could be argued that this is a specific edge-case, but it appears to do the job nicely for what was required. Let me know if you have any thoughts or suggestions.
-Patrick
The fine print: The use of this software is at your own risk – No warrantee is expressed or implied.
EDIT #1 (7/06/15): I’ve gone ahead and refactored a few things on this project. The following has changed:
- ADCST will now Sync nominated Group’s to Active Directory as contact Objects (I want to change this to normal Group objects with members expanded from source groups). (Synced Group [Distinguished name] destination defined using the “GroupsDestinationOUDN” App.Config Value + Source Group defined using AzureADGroupsGroup App.Config Value).
- Users that are synced are now added to a nominated security group – This can be used to lock down groups/resources in Exchange to Internal users as well as contact objects contained in this new security group to prevent spam. (Group [distinguished named] defined using the “PermittedSendersGroupDN” App.Config Value).